TRIO of Shenanigans
- Oct 13, 2023
- 3 min read
Tia's Trio's: Continuing with a TRIO of cards made fresh from Riley (the Moose) and Company's latest release. Get ready to laugh and hopefully inspired to create your own group of zany and heartfelt cards from the company with the most hilarious and often snarky sentiments known as Funny Bones.

Funny Bones-Up To Something


CARD #1
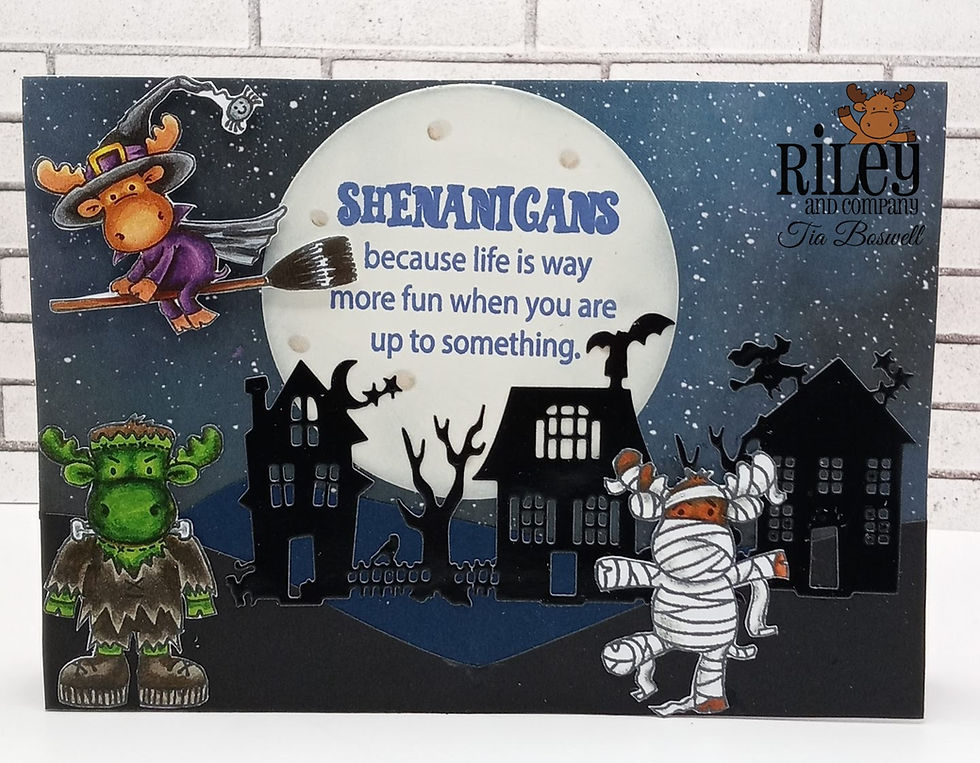
(Left to Right): Witch On Broom; FrankenRiley; Cut-Up: Haunted Village; Mummy Riley
Just in time for Halloween, this fun monster village scene. First I covered my A6 (4.5 x 6.25 inch) card base with a dark sky design paper (sorry-don't know who). I used landscape dies in navy and black to ground the houses in the distance.
Next I colored and fussy cut all of my "characters" so I could move the pieces around and create the scene I wanted.
I die cut the Haunted Village and laid it on my card and realized I needed a big harvest moon to light up the night.
I used a nesting circle die to create my moon. I added craters with COPICS and stamped my sentiment onto it. Then it was the manner of moving the other Riley characters around into a scene I liked.
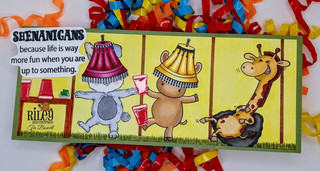
CARD #2

(Left to Right): Basic Dress Up Bunnies; Party Accessories (lampshades & solo cups);
I like to think of this as my tribute to the movie Animal House! See the green-jell-o on the table?
I started with a slim line card front of 3.25 x 8.25 in. I keep a stack of this size card front knowing that they will mat nicely on the 3.5x8.5 in card base
Using my Misti stamp platform I created the scene and stamped everyone at one. I lightly sketched a table for solo cups (and jell-o) and sketched out a "bean-bag" for my giggling giraffe.
On a separate sheet of paper I stamped and inked a multitude of solo drinking cups and the lampshades then fussy cut everything out. (no-no scan and cut machine yet, it's ok really!)
After everything was assembled and glued down, I inked in the shag carpeting, and yellow paneled walls. I adhered to a green card base.
CARD #3


Card front (Top to bottom): Basic Dress Up Giraffe ; Basic Dress Up Riley; Basic Dress Up Raccoon/Fox; Basic Dress Up Possum;
Sentiment-Up to Something; Cut Up-Brick Wall; Happy-Cut Up Balloon Borders and Birthday-Cut Up Balloon Letters
To get everyone on this card, I started out with a large 5x7 in card base. I covered the base with design paper and also used the brick wall cut up to cut up the brick paper! I inked the edges with black ink to help it stand out. I applied foam tape, but did not adhere until I had placed all the characters behind the wall.
After coloring and cutting out each of the "characters" I began gluing them to the wall. Once I had them all placed, I removed the foam backing and adhered to the card base.
I stamped and heat embossed the sentiment (the shine really makes it pop in person). I popped it up on foam tape too.
It was my mom's idea to make it a birthday card! (I love when she comes to hang out with me while I craft!) So I took snips of the balloons and ribbon tails and snuck them around the front characters and then carried the theme all the way inside the card!
The confetti is a stamp from the Dress Up- Party Accessories .
Thank you!!!
Thanks for following along with another TRIO set from Riley and Company! All of these cards were created from the September release where I was assigned five of the new Funny Bone sentiments, so make sure you come back to see more TRIOS I create from them.
There are also cards from the incredibly creative Veggie Lane stamps!
Please, please, please-If you're not already following me, please scroll to the bottom of the page and sign-up!
You'll want to see the other TRIOS from Riley and Company's Funny Bone Collection.
I am also on the Design Teams for:
and
(they have a card challenge where you can win digital stamps!)
Thanks so much!
Hope to have inspired you-now GO GET CRAFTY!
-Tia


Hi! Your card has been chosen as "Paper Project of the Month" in TPC Magazine: https://www.magazine.thepapercrafting.com/ Could you please send a message to editor@thepapercrafting.com Best wishes Marit Pedersen TPC Magazine